Leave a comment

Welcome to All Things Crochet!

In this blog I’ll be discussing various crochet stitches and techniques as I continue to explore them myself. I love learning new techniques, experimenting with known stitches and developing new ways to use them. I also love crocheting and enjoying sharing it with others.

Subscribe to My Crochet Channel or go to: YouTube.com TanisGalik

First, there is Interlocking Crochet™. While I continue to develop Interlocking Crochet™ designs and projects, I’m also working to make the technique more accessible to all crocheters through free videos, comments on various forums such as Ravelry, answering personal questions by email and creating schematics (using crochet symbols instead of words for each design).

Slip Stitch Scarf
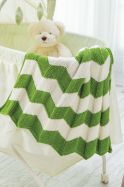
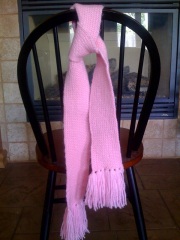
My other focus is Simple and Sensational™. I want to encourage new crocheters – young and old – to enjoy crocheting as much as I do. I’m creating a program that will walk beginners (or those who just want to revisit crochet) through various stitches, starting with the most basic and moving to the more complicated techniques. The fabric in the picture is a perfect example. It is made from what? Slip stitches!!! As I went back to the absolute most basic stitch, what was the result? A lovely scarf made entirely from slip stitches. It proves to be a great first project for anyone learning this simple stitch.

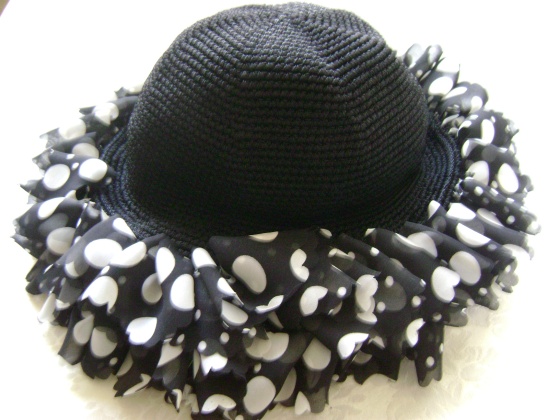
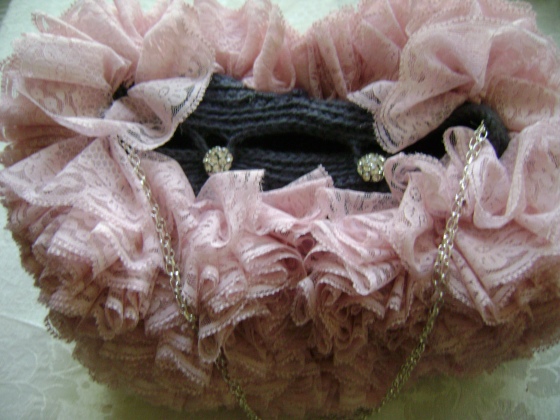
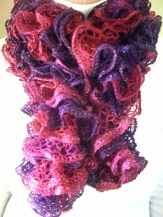
And what could be better in these difficult economic times than to create luxurious, high fashion items at a reasonable price? The satisfaction of creating a beautiful item for yourself or the joy of making an exquisite present gift for someone else is the real gift of crochet.

Leave a comment

Adding Wire to Your Crochet Projects

Incorporating wire into some of your projects gives them extra body. I used a 20-gauge craft wire that you can find in a craft store’s jewelry section. Of course, what is nice – the wire comes in a variety of colors. I used black for this project since I worked with black nylon yarn for the hat brim.

It’s best to work with a tight stitch like a single crochet. As you work a simple single crochet, carry the wire along the back of the stitch so it won’t show. If you use a larger stitch like a double crochet, it probably will peek through some of the spaces. But if you just use a normal single crochet, the wire will be encased as you carry it along the back of your project. It’s quite simple to do and it adds a lot of body and flexibility to whatever you’re making.

When you have completed the wire, make sure you leave a little end sticking out. Then cut your wire. You will have two ends – at the beginning and the end.  Fold over the wire ends. Normally I would try to carry them up into the next row and work over the ends again to help cover them up. Ultimately you will have to take a needle and a thread that matches your yarn to sew over the ends.  Completely cover the ends. This will hold them in place and protect you from the sharp points.

I’ve used wire to enhance certain projects, especially the brim of a hat to add body and flexibility to it so it can be rolled up if I choose to wear it that way. It also helps to hold its shape. Purses are another project that can benefit from using wire for added strength and shaping.

sunhat

flamingo

Leave a comment

Goodbye to Mesh, Ribbon and Fabric Yarn

Unfortunately many of the ribbon and mesh yarns have been discontinued. However, you may be one of the lucky ones to still have a ball or two. If not, maybe you can search and find some. I especially enjoyed working with this type of “yarn” combined with more traditional yarn as its base. I’m definitely going to miss it. However, I decided to still put up some of my favorite patterns using this type of “yarn” under Ruffles Galore. If you have or can find this type of yarn, please give one of these free patterns a try. I think you’ll enjoy the results. I know anyone who receives one of these gifts will.

Leave a comment

Crochet! Spring 2016

I’m happy to announce that I have two new patterns featured in the Crochet! Spring 2016 edition.

The Hanover Baby Blanket is found on page 90 of Crochet! Spring 2016. Work Tunisian crochet in columns turning this unisex baby blanket on its end. Use the waffle stitch to create a zigzag pattern. Then connect as many columns as you want to make this baby blanket or keep adding them to create an afghan. The best thing is – the entire project is add as you go so no sewing is involved. A great project for using your yarn stash.

The Butterfly Nest Scarf is found on page 12 of Crochet Spring 2016. Repetition of simple stitches interspersed with spectacular Solomon’s knots make this scarf a “must-make”.

Crochet!_Spring16_Butterfly Nest ScarfCrochet_Spr16_COVCrochet!_Spring16_Hanover Baby Blanket

Leave a comment

How to Block a Crocheted Item

Blocking a crocheted item gives it a finished, professional look. The process of blocking involves shaping and pinning the crocheted piece into the correct shape before completing an item. It is especially useful

Subscribe to My Crochet Channel or go to: YouTube.com TanisGalik

in taking various shapes such as squares and making them a consistent size before you join them together as in a granny or sampler square afghan.

First, you need a padded surface with a graph on it. A good choice would be a flat board you can stick pins in such as a cork bulletin board. I often use an ironing board for blocking small items. Cover your blocking surface with a clean pad such as thick cotton towels or cotton batting. To create a graph over the padding, the simple solution is to use gingham or some other fabric covered with one inch, half inch or quarter inch squares. (See pictures below.) Fasten the fabric over the padded surface.

Using metal rustproof pins (no plastic because they can melt if you are using heat), pin your item on the graph. Use plenty of straight pins to easy your item into the desired shape.

For blocking yarns made from acrylic and other synthetic yarns, after pinning the item into shape, use a spray bottle with clean water and mist over the item until it is moist, but not saturated. Pat the item so it is thoroughly damp. Allow the item to dry completely. Remove the pins.

For blocking wool, cotton or linen yarns, pin the item into the desired shape. Then take a damp, clean cloth and lay it over the crocheted item. Take a steam iron set to the correct temperature for the yarn, hold the iron about an inch over the item and move the iron above the item until the cloth is warm. Do NOT put the iron down on the cloth and “iron” the crocheted item. Remove the cloth and test the crocheted item. If the yarn is damp and warm, it is ready. Remove the cloth and allow the item to dry completely. Remove the pins. (I sometimes will block an acrylic yarn this way, but you must be very careful NOT to put the iron on top of the cloth covering.)


Checkerboard large

Checkerboard small

Video: How to Block a Crocheted Item

Leave a comment

Why Meet with Local Crafters?

I live in a small town. While visiting a local sanctuary for abandoned animals, the tour guide (knowing I’m a crocheter), asked if I could refer her to any spinners. They had just sheared their alpacas, sheep and other yarn-producing animals and they wanted to sell the “wool” at a large discount to someone who could process it further. Our community has many artists, including a very active quilting organization; however, I personally didn’t know any other yarn crafters. So I decided it was time to change that.

Subscribe to My Crochet Channel or go to: YouTube.com TanisGalik

Recently the book store and the scrapbooking store have introduced yarn into their stocks. Since the scrapbooking store (www.pictureperfectandstamps.com) had a room for classes and parties, I decided to approach the owner with my idea. Kathi wanted to expand her yarn area and had already started to offer knitting and crochet classes. She liked my idea and we decided to name out gathering – Fiber Fun, to include all fiber enthusiasts – knitters, crocheters, spinners, needle crafters, etc. Her store is located in the center of the town, near various art galleries and antique stores. On the first Friday of each month from 5pm-8pm the gallery features different artists and holds a small reception. Other stores follow suit offering music and snacks to their visitors. We thought this would be the perfect time for our meeting also.

We added Fiber Fun to the local calendar and invited everyone we met. It has proved to be a very pleasant experience. Crafters bring their current projects, coming and going as they please. We even take a break to visit the other exhibits. Other guests stop by to see what is going on in our space.

Sharing projects and yarn knowledge has proved to be very beneficial for everyone involved. The more experienced crocheters help those that are learning, especially with reading patterns and then exchange ideas and techniques with each other.

At our last meeting, the knitters were making a ruffled boa-like scarf from a new-to-me Bernat’s mesh yarn. They were following the directions on the label. The crocheters wanted to make the same scarf, but there were no crochet instructions. As a result, I bought a few skeins and took them home. After some experimentation, I came up with three crocheted scarves using this yarn. (Two free patterns are available under Simple & Sensational™: Afghan Ruffle Scarf and Double Crochet Ruffle scarf.) If it wasn’t for meeting with this group, I probably would never have thought to do this.

To look for an established group in your area check out the Crochet Guild of American (www.crochet.org). If there is none, why not take the initiative and start your own? Find a location, pick a convenient time and start inviting people. You’ll find this artistic association not only fun, but educational as well.

Leave a comment

How to Crochet with Mesh Yarn

There are several companies producing a variegated acrylic yarn which, when spread out, looks like a mesh web. Its principle use is to create ruffles for decorating other items or making a scarf.

Subscribe to My Crochet Channel or go to: YouTube.com TanisGalik

One mesh yarn is made by Bernat (www.bernat.com). Two versions of a crocheted ruffled scarf using this yarn are available on my website Afghan Stitch Ruffled Scarf and Double Crochet Ruffled Scarf. Another mesh yarn is made by Red Heart (www.redheart.com) – Boutique Sashay. How to make a single crochet ruffled scarf is found at the Red Heart website. (Pictures of ruffled scarves made from these two different yarns are below.)

Some of the differences between the two mesh yarns are:

Bernat’s mesh is smaller, a G/6 (4mm) or H/8 (5mm) hook works best with it. The Red Heart mesh is much larger so a J/10 (6mm) or K/10.5 (6.5mm) hook works well with it.

The Bernat yarn has a flat finish. The Red Heart yarn sparkles due to a silver thread running through out.

Especially when using the darker colors, I worked the Bernat yarn against a light background (putting a light towel over my lap) so I could see the spaces more easily. This wasn’t necessary for the Red Heart yarn since the spaces were much larger.

The Bernat mesh can be crocheted using either edge. The Red Heart mesh has two distinct edges. One is a border woven with silver thread and is not to be crocheted. The opposite edge has a doubled row. You crochet this yarn using the row just below the doubled edge.

To work the Bernat yarn skip 1″ (2.5cm) or roughly two mesh spaces between each stitch. Because of the larger meshes, the Red Heart yarn is usually worked by skipping one space between stitches.

To make each scarf I worked six stitches across each row. Six double crochets with the Bernat yarn and six single crochets with the Red Heart yarn. For a demonstration of each technique go to: YouTube.com Tanis Galik Double Crochet Ruffled Scarf for the double crochet method and www.RedHeart.com yarn boutique-sashay for the single crochet method.

Initially the Red Heart yarn worked up a little faster. However, once I was in a double crochet rhythm with the Bernat, it required about the same time to make each scarf.

One skein of the Bernat yarn made a scarf about 38″ (96.5cm) long; the Red Heart scarf was about 40″ (101.5cm) in length. Obviously, two skeins created an extra long scarf equaling twice the length – 76″ (193cm) or 80″ (203cm).

As you can see from the pictures, each mesh yarn crochets into a beautiful ruffled scarf. It’s just a matter of personal choice as to which scarf you prefer.

Bernat Ruffled Scarf or the Red Heart Ruffled Scarf

Bernat Ruffled ScarfDark Purple Red Ruffled Scarf


Leave a comment

Using Crocheted Edgings on your Handmade Projects

Nothing adds a personal touch to your crocheted or knitted item than including a handmade edging. No matter the pattern or design, adding a beautiful edging will only enhance the beauty and uniqueness of any afghan, baby blanket, sweater, shawl, scarf or hat you make.

Subscribe to My Crochet Channel or go to: YouTube.com TanisGalik

The border can be as simple as picot stitches around the edge or as fancy as a special trim crocheted by following a more complex design. Below are several books by celebrated crochet authors, designers and teachers. Follow any design as written or add your personal touches by incorporating beads into the trim, including a border of fringe, using numerous colored yarns, layering several edgings together or just simply create your own.

Crocheting on the Edge by Nicky Epstein, provides a wide variety of over 200 crocheted edgings.

Around the Corner Crochet Borders by Edie Eckman, a beautifully illustrated collection of borders with detailed instructions and charts to help you around those sometimes difficult corners. 50 Crocheted Afghan Borders and 50 More Crocheted Afghan Borders by Rita Weiss Creative Partners, Jean Leihauser, both ladies pioneers in crochet design.

Leave a comment

Beyond the Basic Granny Square – Part 1

101 Granny Squares – New Motifs for Contemporary Designs edited by Carol Alexander

This book contains patterns by 26 designers, many very well known. Basic granny squares are incorporated into cardigans, jewelry, purses, clothing, hats, curtains, tablecloths, and rugs. A few I really like are the Reversible Button & Beads Headband and the free-form Bag Lady purse. There are several granny square motifs provided for use in a poncho. You could choose one design or several to create a beautiful bedspread. One of my all-time favorites is the Pretty Patchwork afghan by Margret Willson shown on the cover.

Subscribe to My Crochet Channel or go to: YouTube.com TanisGalik

200 Crochet Block for Blankets, Throws and Afghans by Jan Eaton

When you are ready to move beyond a basic granny, this book offers some interesting alternatives. You can follow the suggested combination of blocks or create your own. The nice thing is the coordinating blocks are sized to fit together if you use the same weight yarn. I especially like the Floral Fantasy combination on page 29. She also offers some edging choices to add that personal touch to your finished project.

Leave a comment

Thank You Crochet Today!

As I was going through my new Crochet Today! Magazine, what did I find? A nice review of my book, Interlocking Crochet™! This was a really nice surprise so thank you to Crochet Today!

Subscribe to My Crochet Channel or go to: YouTube.com TanisGalik

If you don’t have your own copy, go to their webpage www.crochettoday.com.